本文仅记录一些看似无意义的小改动,你可以在本文get:
- 各种自定义样式的
路径 - 如何自定义字体和文字色块
- 如何增加评分的小星星
- 插件的总结等…
对于没学过任何CSS的我能改成这样实属不易,还望各位大佬指出我的错误并五星好评。
仅适用于2.2-3.0版本,路径和字段可能已经发生变化
修改主题,先装依赖
出现报错,未安装渲染依赖!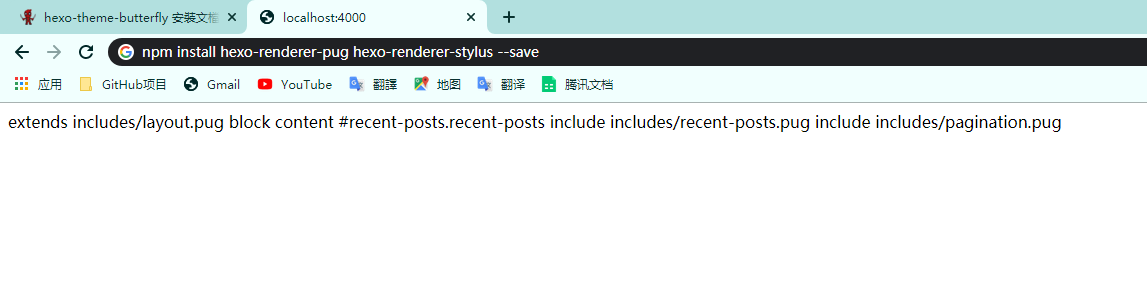
执行以下命令
1 | npm install hexo-renderer-pug hexo-renderer-stylus --save |
菜单栏设置
新版本默认是中文,但是修改根目录配置文件的language为zh-CN之后,菜单栏会变回英文。直接修改主题配置文件menu为中文即可
1
2
3
4
5
6
menu:
首页: / || fa fa-home
归档: /archives/ || fa fa-archive
标签: /tags/ || fa fa-tags
分类: /categories/ || fa fa-list-ul
友链: /link/ || fa fa-cogs首页留空表示跳转起始页,若加上
/home/则为新页面,类似分类标签页菜单栏跳转外链,去掉
/直接写链接即可
1 | 云盘 || http://kd.xiabor.com || fa fa-mixcloud |
文章主页描述
关闭自动节选,才能在Page Front-matter中添加description
1 | # 自動節選 |
代码高亮及自动换行
- 代码高亮试了其他的插件,Mac Pannel样式等,调来调去还不如默认的,索性不改了
- 打开自动换行
code_word_wrap: true,根目录下配置文件_config.yml,將 line_number 改成 false:1
2
3
4
5highlight:
enable: true
line_number: false
auto_detect: false
tab_replace:
事实证明,代码换行在移动端很不舒服,还是关掉吧。
主题美化
- 取消主题配置文件
theme_color的注释 - 自定义主色调为浅绿,设置footer显示图片背景与top_img一致。
- 推荐文章设置
limit: 3 - 打开图片文字描述
photofigcaption: true - 设置评论区打字冒光和抖动效果,
activate_power_mode: true - 鼠标点击出现爱心
click_heart: true - 美化页面展示,修改标题前图标为闪电
title-prefix-icon:'\f0e7',颜色为黄色title-prefix-icon-color: "#ffb821" - 主页调用金山词霸的每日一句打字效果,需注意的是:自定义副标题sub的时候,符号必须用ASCII码表示,常用的逗号为
,句号为.双引号为"英文缩写符号为' - 打开snackbar弹窗并设置底部居中
position: bottom-center - 打开中英文之间添加空格
pangu: true
至此主题配置文件在不装插件前提下算是修改完毕了,明天继续折腾插件和css样式。眼睛疼,睡了
自定义样式
- 修改菜单字体大小为18,修改鼠标悬停时颜色为主色调浅绿。
在路径
D:\blog\themes\Butterfly\source\css\_layout\head.styl下查找.site-page,设置font-size为.7rem在此目录下
D:\blog\themes\Butterfly\source\css\var.styl新增自定义颜色值$laurel-green = #9fefaf,在路径D:\blog\themes\Butterfly\source\css\_layout\head.styl下修改&:hover: $laurel-green
hexo clean && hexo s查看效果
由于菜单打开子菜单是悬停后选中,鼠标移开子菜单便关闭。导致鼠标如果不是从主菜单近乎垂直往下滑就无法点击子菜单。(改动意义似乎不大)自定义修改参考旧版本如下:路径
D:\blog\themes\Butterfly\source\css\layout\head.styl1
2
3
4
5
6
7
8
9
10
11
12
13
14
15
16
17
18
19
20
21
22
23.menus_item_child
position: absolute
right: 0
display: none
margin-top: 8px
padding: 0
border-radius: 5px
width: max-content
background-color: alpha($white, .8)
box-shadow: 0 5px 20px -4px rgba($dark-black, .5)
animation: sub_menus .3s .1s ease both
&:before
position: absolute
top: -55px
left: 50%
width: 0
height: 21px
content: ''
margin-left: -18px
border-width: 18px
border-style: solid
border-color: transparent transparent rgba($white 0.8)主页文章区域,路径均为
D:\blog\themes\Butterfly\source\css\_layout\pagination.styl外圆角修改为5px,且图片与描述圆角为3px
主页文章描述修改,增加描述区域高度,标题距离描述适当增加,字体由1.2调整至1rem
1
2
3
4
5
6
7
8
9
10
11
12
13
14
15
16
17
18& >.recent-post-info
display: inline-block
overflow: hidden
padding: 50px 40px
width: 55%
& > .article-title
display: -webkit-box
overflow: hidden
margin-bottom: 1.2rem
color: $font-black
text-overflow: ellipsis
word-wrap: break-word
font-size: 1.2rem
line-height: 1.5
transition: all .2s ease-in-out
-webkit-box-orient: vertical
-webkit-line-clamp: 2描述文字可能较多,因此调整溢出方式为scroll
> .content 1
2
3
4
5
6
7display: -webkit-box
overflow: scroll
margin-top: .2rem
height: 97px
word-break: break-word
-webkit-line-clamp: 3
-webkit-box-orient: vertical并适当降低侧栏滚动条宽度,-webkit-scrollbar路径为
D:\blog\themes\Butterfly\source\css\_global\index.styl- 调整分类和发表时间字体大小为80%,路径
D:\blog\themes\Butterfly\source\css\_layout\page.styl1
2& > .article-meta-wrap
font-size: 80%
- 调整分类和发表时间字体大小为80%,路径
调整移动端主页文章区域边距5px为0.75rem,调整移动端描述字体大小为0.6rem
1
2
3
4
5
6
7@media screen and (max-width: $sm)
.layout_page
padding: 1rem 0.75rem !important
.content
height: auto
font-size: 0.6rem既然要圆润,那就全部都要圆润。调整页码圆角,算了,直接改成圆形。路径为
D:\blog\themes\Butterfly\source\css\_layout\pagination.styl1
2
3
4
5
6
7
8
9
10
11
12
13
14.page-number
display: inline-block
margin: 0 .2rem
min-width: w = 1.5rem
height: w
text-align: center
line-height: w
cursor: pointer
&.current
background: $theme-color
color: $button-color
cursor: default
border-radius: 20px调整页脚高度,去除驱动和主题描述,,修改By字母为红色爱心。
- 在路径
D:\blog\themes\Butterfly\layout\includes\footer.pug下,将By替换为以下内容1
<i style="color:#FF6A6A" class="fa fa-heartbeat"></i>
- 同一路径下,删除以下内容,便可以去除驱动和主题描述,也可以按照以下格式添加自定义内容
1
2
3
4
5
6
7
8.framework-info
span= _p('footer.driven') + ' '
a(href='https://hexo.io')
span Hexo
span.footer-separator |
span= _p('footer.theme') + ' '
a(href='https://github.com/jerryc127/hexo-theme-butterfly')
span Butterfly - 利用PS修改ICP图标大小为18x18,头像,图标,加载动画等在
D:\blog\themes\Butterfly\source\img中可替换。
- 在路径
修改侧栏设置及返回顶部按钮
- 在路径
D:\blog\themes\Butterfly\source\css\_layout\rightside.styl下加大按钮高宽度并设置圆角,调整间距,使设置按钮的子菜单不打开状态隐藏到最右侧不可见。1
2
3
4
5
6
7
8
9
10
11
12
13
14
15
16
17
18
19
20
21
22
23
24
25
26#rightside
position: fixed
right: -38px
bottom: 10px
opacity: 0
transition: all .3s
#rightside-config-hide
transform: translate(40px, 0)
& > div
& > i,
& > a,
& > div
display: block
margin-bottom: 2px
width: 36px
height: 36px
background-color: $light-blue
color: $button-color
text-align: center
font-size: 16px
line-height: 35px
margin-bottom: 4px
margin-right: 4px
cursor: pointer
border-radius: 3px
- 在路径
文章目录美化
- 调整左侧边距0.5rem为2rem
- 选择某一目录时,背景框宽度为最大且为方形,修改选中时边框为圆润且适应标题长度,路径
D:\blog\themes\Butterfly\source\css\_layout\sidebar.styl下修改或增加以下内容1
2
3
4
5
6
7
8
9
10.toc-link
&.active
border-right-color: darken($theme-toc-color, 20%)
background: $theme-toc-color
color: $sidebar-active-color
border-radius: 5px
width: max-content
padding-right: 5px
padding-left: 5px
打赏按钮美化,设置圆角并修改颜色,调整赞赏码大小确保能扫描成功
- 路径
D:\blog\themes\Butterfly\source\css\_layout\reward.styl下修改赞赏码大小,默认130,扫描可能无法识别,建议200。
- 路径
修改底部标签边框和字体为黑色,调整大小。底部版权声明增加1px边框
路径
D:\blog\themes\Butterfly\source\css\_layout\post.styl下修改以下内容1
2
3
4
5
6
7
8
9
10
11
12
13
14
15
16
17
18
19
20
21
22
23
24
25&__tags
display: inline-block
margin: .4rem .4rem .4rem 0
padding: 0 .6rem
width: fit-content
border: 2px solid $font-black
border-radius: .2rem
color: $font-black
font-size: 14px
text-decoration: overline
cursor: pointer
transition: all .2s ease-in-out
.post-copyright
position: relative
margin: 2rem 0 .5rem
padding: .5rem .8rem
border: 1px solid $dark-white
transition: box-shadow .3s ease-in-out
border-radius: 5px
.post-copyright
&-meta
color: $grey
font-weight: bold提到版权申明,修改默认的灰色链接的颜色为蓝色。可以先在
D:\blog\themes\Butterfly\source\css\var.styl里添加自定义颜色,再去post.styl里修改,或者直接修改链接颜色为蓝色。修改其他自定义颜色的方法亦是如此。1
$a-link-color = #638fff
版权声明
文章作者: xx
文章链接: https://xxx
版权声明: 本博客所有文章除特别声明外,均采用 CC BY-NC-SA 4.0 许可协议。点击这部分的
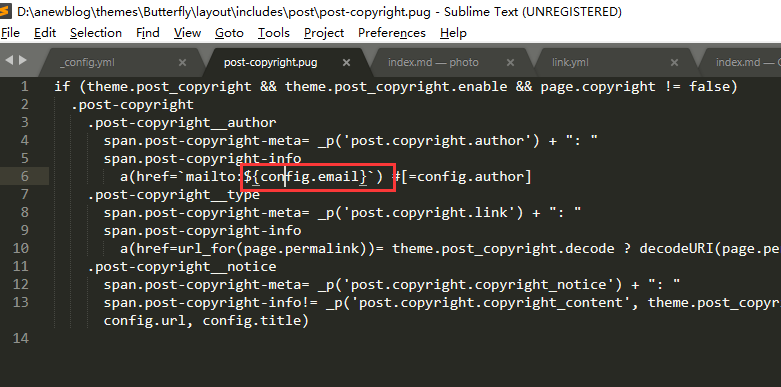
文章作者出现mailto:undefined,查看copyright.pug文件发现email需要在根目录config.yml下自定义
因此在根目录config.yml下添加即可
1
email: xxxx@xxx.com
文字色块样式
- 参照我之前的文章:Hexo写文章的一些小技巧
- 这里展示一下效果:黄色色块 绿色色块 灰色色块
上边框蓝色块级
- 举个栗子:在路径
D:\blog\themes\Butterfly\source\css\_layout\post.styl下添加色块的引用样式,写文章时调用标签即可。1
2
3
4
5
6
7
8
9
10
11
12
13
14// 颜色块-黄
span#inline-yellow {
display:inline;
padding:.2em .6em .3em;
font-size:90%;
font-weight:normal;
line-height:1;
color:#000;
text-align:center;
white-space:nowrap;
vertical-align:baseline;
border-radius:0.1rem;
background-color: #FFD700;
} - 调用方法及效果黄色色块
1
<span id="inline-yellow">黄色色块</span>
Rating评分
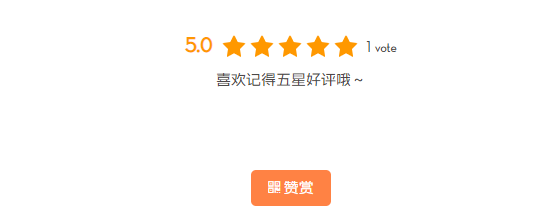
评价文章打字麻烦?那就用小星星吧,直接给文章打分。效果如下:
- 配置教程:参考学姐的添加Rating投票功能
- 官网传送门:widgetpack.com
由于butterfly主题和next、Sakura等主题文件结构不同,所以详细记录本主题的配置:
注册完Widgetpack选择Rating可以拿到一段代码如下:
1
2
3
4
5
6
7
8
9
10
11
12
13
14
15<div id="wpac-rating"></div>
<script type="text/javascript">
wpac_init = window.wpac_init || [];
wpac_init.push({widget: 'Rating', id: 你的IDxxx});
(function() {
if ('WIDGETPACK_LOADED' in window) return;
WIDGETPACK_LOADED = true;
var mc = document.createElement('script');
mc.type = 'text/javascript';
mc.async = true;
mc.src = 'https://embed.widgetpack.com/widget.js';
var s = document.getElementsByTagName('script')[0]; s.parentNode.insertBefore(mc, s.nextSibling);
})();
</script>
<a href="https://widgetpack.com" class="wpac-cr">Star Rating WIDGET PACK</a>利用在线转化将其转为
.pug格式,并增加点小改动,使其居中。创建并放入目录D:\blog\themes\Butterfly\layout\includes\addons\rating.pub中1
2
3
4
5
6
7
8
9
10
11
12
13
14
15
16
17html
body
#wpac-rating(align="center")
script(type="text/javascript").
wpac_init = window.wpac_init || [];
wpac_init.push({widget: 'Rating', id: 你的ID});
(function() {
if ('WIDGETPACK_LOADED' in window) return;
WIDGETPACK_LOADED = true;
var mc = document.createElement('script');
mc.type = 'text/javascript';
mc.async = true;
mc.src = 'https://embed.widgetpack.com/widget.js';
var s = document.getElementsByTagName('script')[0]; s.parentNode.insertBefore(mc, s.nextSibling);
})();
#copy(align="center")
| ღ喜欢记得五星好评哦~在合适位置引入评分,例如我的:(置于赞赏的上面)
1
2
3
4
5if theme.rating.enable
include includes/addons/rating.pug
//-加入以上代码,下面为赞赏
if theme.reward.enable
!=partial('includes/post/reward', {}, {cache:theme.fragment_cache})最后,在主题配置文件设置是否打开该功能,星星颜色在widgetpack.com修改
1
2
3
4# Star rating support to each article.
# To get your ID visit https://widgetpack.com
rating:
enable: true特别提示:
设置投票记录方式,有三种可选,国内最好选择IP Address记录。另外,widgetpack.com只能绑定一个域名,但可以随时更换特别鸣谢@GamerNoTitle,一提需求,立马奋笔疾书教我配置小星星。还回来看我文章并指出错误,佩服大佬的细心与热心。
自动切换夜间模式时间
- 修改夜间模式自动切换时间为晚上21点至早晨7点,路径
D:\blog\themes\Butterfly\layout\includes\head\darkmode.styl,修改时注意格式不变
移动端优化
- PC端分类归档标签等是显示在右侧,移动端则在底部,与侧栏重复,因此去除分类标签归档个人信息,只保留网站统计。将以下代码添加进任意
.styl文件里即可。效果如图(补充:调整移动端底部网站资讯字体大小为13px)1
2
3
4
5@media screen and (max-width: $sm)
#aside_content
div:not(:last-child)
display: none
font-size: 13px
- 手机端侧栏美化,缩小头像及菜单间距。路径
D:\blog\themes\Butterfly\source\css\mobile-sidebar.styl下自行调整
这里提供旧版样式,写入末尾即可
1 | // 手機打開menus,toc特效 |
- 在路径
post.styl下调整移动端.post_cover圆角为5px
调整移动端文章字体大小
- 在
D:\blog\themes\Butterfly\source\css\var.styl下自定义一个字体大小值,例如:$font-media-size = 13px,然后在D:\anewblog\themes\Butterfly\source\css\_global\index.styl增加以下内容1
2
3@media screen and (max-width: $sm)
body
font-size: $font-media-size = 13px
侧栏自定义
- 加入书签按钮设置圆角
aside.styl1
2
3
4
5
6
7
8
9#bookmark-it
position: relative
z-index: 1
display: block
background-color: $light-blue
color: $button-color
text-transform: uppercase
line-height: 1.6rem
border-radius: 5px - 顺便设置选中时的圆角
D:\blog\themes\Butterfly\source\css\_global\index.styl1
2
3
4
5
6
7
8
9
10
11
12.button--animated
transition-duration: 1s
transition-property: color
&:before
position: absolute
top: 0
right: 0
bottom: 0
left: 0
z-index: -1
border-radius: 5px - 修改某些名称,例如网站资讯的名称在
D:\blog\themes\Butterfly\languages\zh-CN下修改即可
自定义字体,图标
引用外部字体和鼠标样式
引用格式
1
2
3@font-face { font-family:MyFont;
src: url(https:xxx)}
body{font-family:MyFont;}引用方法:
将引用代码添加到D:\blog\themes\Butterfly\source\css\_third-partynormalize.min.css末尾即可,鼠标样式亦是如此。
鼠标样式
引用格式
1
2
3
4
5
6
7
8
9body {
cursor: url(https://xxx),
default;
}
a,
img {
cursor: url(https://xxx),
default;
}修改推荐文章和翻页文章图
在
D:\wblog\themes\Butterfly\source\css\_layout\relatedposts.styl下修改推荐文章的图片圆角为8px在
D:\wblog\themes\Butterfly\source\css\_layout\pagination.styl下修改上一篇下一篇文章图圆角为8px,并调整亮度为0.5
1 | #pagination |
修改图标
可直接使用Font Awesome的图标。地址:Font Awesome
在路径
D:\wblog\themes\Butterfly\layout\includes\mixins\UI.pug不对等我找找。第二天找到了正确的路径为D:\anewblog\themes\Butterfly\layout\includes\header\post-info/pug可修改文章内头部(发表、更新、分类等)图标。1
2
3
4
5
6
7
8
9
10
11
12
13
14
15
16#post-meta
.meta-firstline
if (theme.post_meta.post.date_type)
if (theme.post_meta.post.date_type === 'both')
time.post-meta__date
span.post-meta__date-created(title= _p('post.created')+' '+full_date(page.date))
i.fa.fa-pencil(aria-hidden="true")
=' '+_p('post.created')+' '+date(page.date, config.date_format)
span.post-meta__separator |
span.post-meta__date-updated(title= _p('post.updated')+' '+full_date(page.updated))
i.fa.fa-wrench(aria-hidden="true")
=' '+_p('post.updated')+' '+date(page.updated, config.date_format)
else
- var data_type_update = theme.post_meta.post.date_type === 'updated'
- var date_type = data_type_update ? 'updated' : 'date'
- var date_icon = data_type_update ? 'fa-wrench' :'fa-pencil'修改主页文章的分类和发表时间图标,在路径
D:\blog\themes\Butterfly\layout\includes\recet-post.pug下修改即可。
新版本已经整合到D:\blog\themes\Butterfly\layout\includes\mixins\post-ui.pug下1
2
3
4
5
6
7
8
9
10
11
12
13
14
15
16if (theme.post_meta.page.date_type)
if (theme.post_meta.page.date_type === 'both')
time.post-meta__date
span.post-meta__date-created(title=_p('post.created') + ' ' + full_date(article.date))
i.fa.fa-pencil(aria-hidden="true")
=date(article.date, config.date_format)
span.article-meta__separator |
span.post-meta__date-updated(title=_p('post.updated') + ' ' + full_date(article.updated))
i.fa.fa-wrench(aria-hidden="true")
=date(article.updated, config.date_format)
else
- var data_type_updated = theme.post_meta.page.date_type === 'updated'
- var date_type = data_type_updated ? 'updated' : 'date'
- var date_icon = data_type_updated ? 'fa-wrench' :'fa-pencil'
- var date_title = data_type_updated ? _p('post.updated') : _p('post.created')
time.post-meta__date(title=date_title + ' ' + full_date(article[date_type]))例如修改主页底部向下箭头为双箭头,先去Font Awesome找到合适的图标,新版在路径
D:\blog\themes\Butterfly\layout\includes\header\index.pug的末尾修改1
2.scroll-down
i.fa.fa-angle-double-down.scroll-down-effects旧版在路径
H:\blog\themes\Butterfly\layout\includes\nav.pug下修改文章内引用图标,格式如下
1
<i class="fa fa-plane"></i>
插件总结
搜索插件
采用本地搜索,安装插件hexo-generator-search
1
npm install hexo-generator-search --save
根目录配置文件添加以下内容,打开主题配置文件
local_search即可1
2
3
4search:
path: search.xml
field: post
content: true字数统计
安装统计插件,主题配置文件打开
wordcount即可1
npm install hexo-wordcount --save
音乐电影豆瓣插件
安装hexo-douban插件
1
npm install hexo-douban --save
并将以下内容加入根目录配置文件,
hexo douban命令进行初始化1
2
3
4
5
6
7
8
9
10
11
12
13douban:
user: mythsman
builtin: false
book:
title: 'This is my book title'
quote: 'This is my book quote'
movie:
title: 'This is my movie title'
quote: 'This is my movie quote'
game:
title: 'This is my game title'
quote: 'This is my game quote'
timeout: 10000
播放器插件
在Hexo页面中嵌入
APlayer播放器1
npm install --save hexo-tag-aplayer
用法:参数选项详见APlayer
1
{% aplayer title author url [picture_url, narrow, autoplay, width:xxx, lrc:xxx] %}
部署插件
- 安装安装 hexo-deployer-git,填写仓库就可以部署至网络世界啦
1
npm install hexo-deployer-git --save
置顶插件
- 卸载替换置顶插件在文章的front-matter添加top: true 或数值将篇文章置顶
1
2npm uninstall hexo-generator-index --save
npm install hexo-generator-index-pin-top --save
脚注插件
这个插件是最容易忘记的,还好看到文章里有注脚脚注,执行以下命令安装注脚插件:
1
npm install hexo-reference --save
new page
hexo new page xxx
版本更新后建议页面重新建立,再复制md内容进去,否则容易报错。出现报错的页面有music、photo,为什么新建页面一模一样的md复制进去就不报错了呢?
设置页面顶部图
photo、music、link页面均在相应md文件内增加top_img,设置顶部图。
其余在主题配置文件设置即可。
不常见问题
侧栏目录消失
卸载原有的渲染插件,安装新的插件
1
2
3npm un hexo-renderer-marked --save
npm i hexo-renderer-markdown-it --save
菜单栏消失
- 更新产生的问题,将
_data的butterfly.yml移动到其他地方,重新hexo clean&&hexo s,在将主题配置文件拷贝替换butterfl.yml即可。